

In this guide, we'll build a support ticket portal with authentication and role-based access. With Bolt and Pica, you can create a production-ready ticketing system in minutes—using Airtable as your database.
What You'll Build
By the end of this tutorial, you'll have:
- A beautiful support ticket portal with authentication
- Two user roles: users and admins
- Users can submit tickets, view their tickets, check statuses, and manage message threads
- Admins can view all tickets, reply to messages, and update ticket statuses
- Full integration with Airtable for persistent data storage
- Production-ready error handling
Let's get started! 🚀
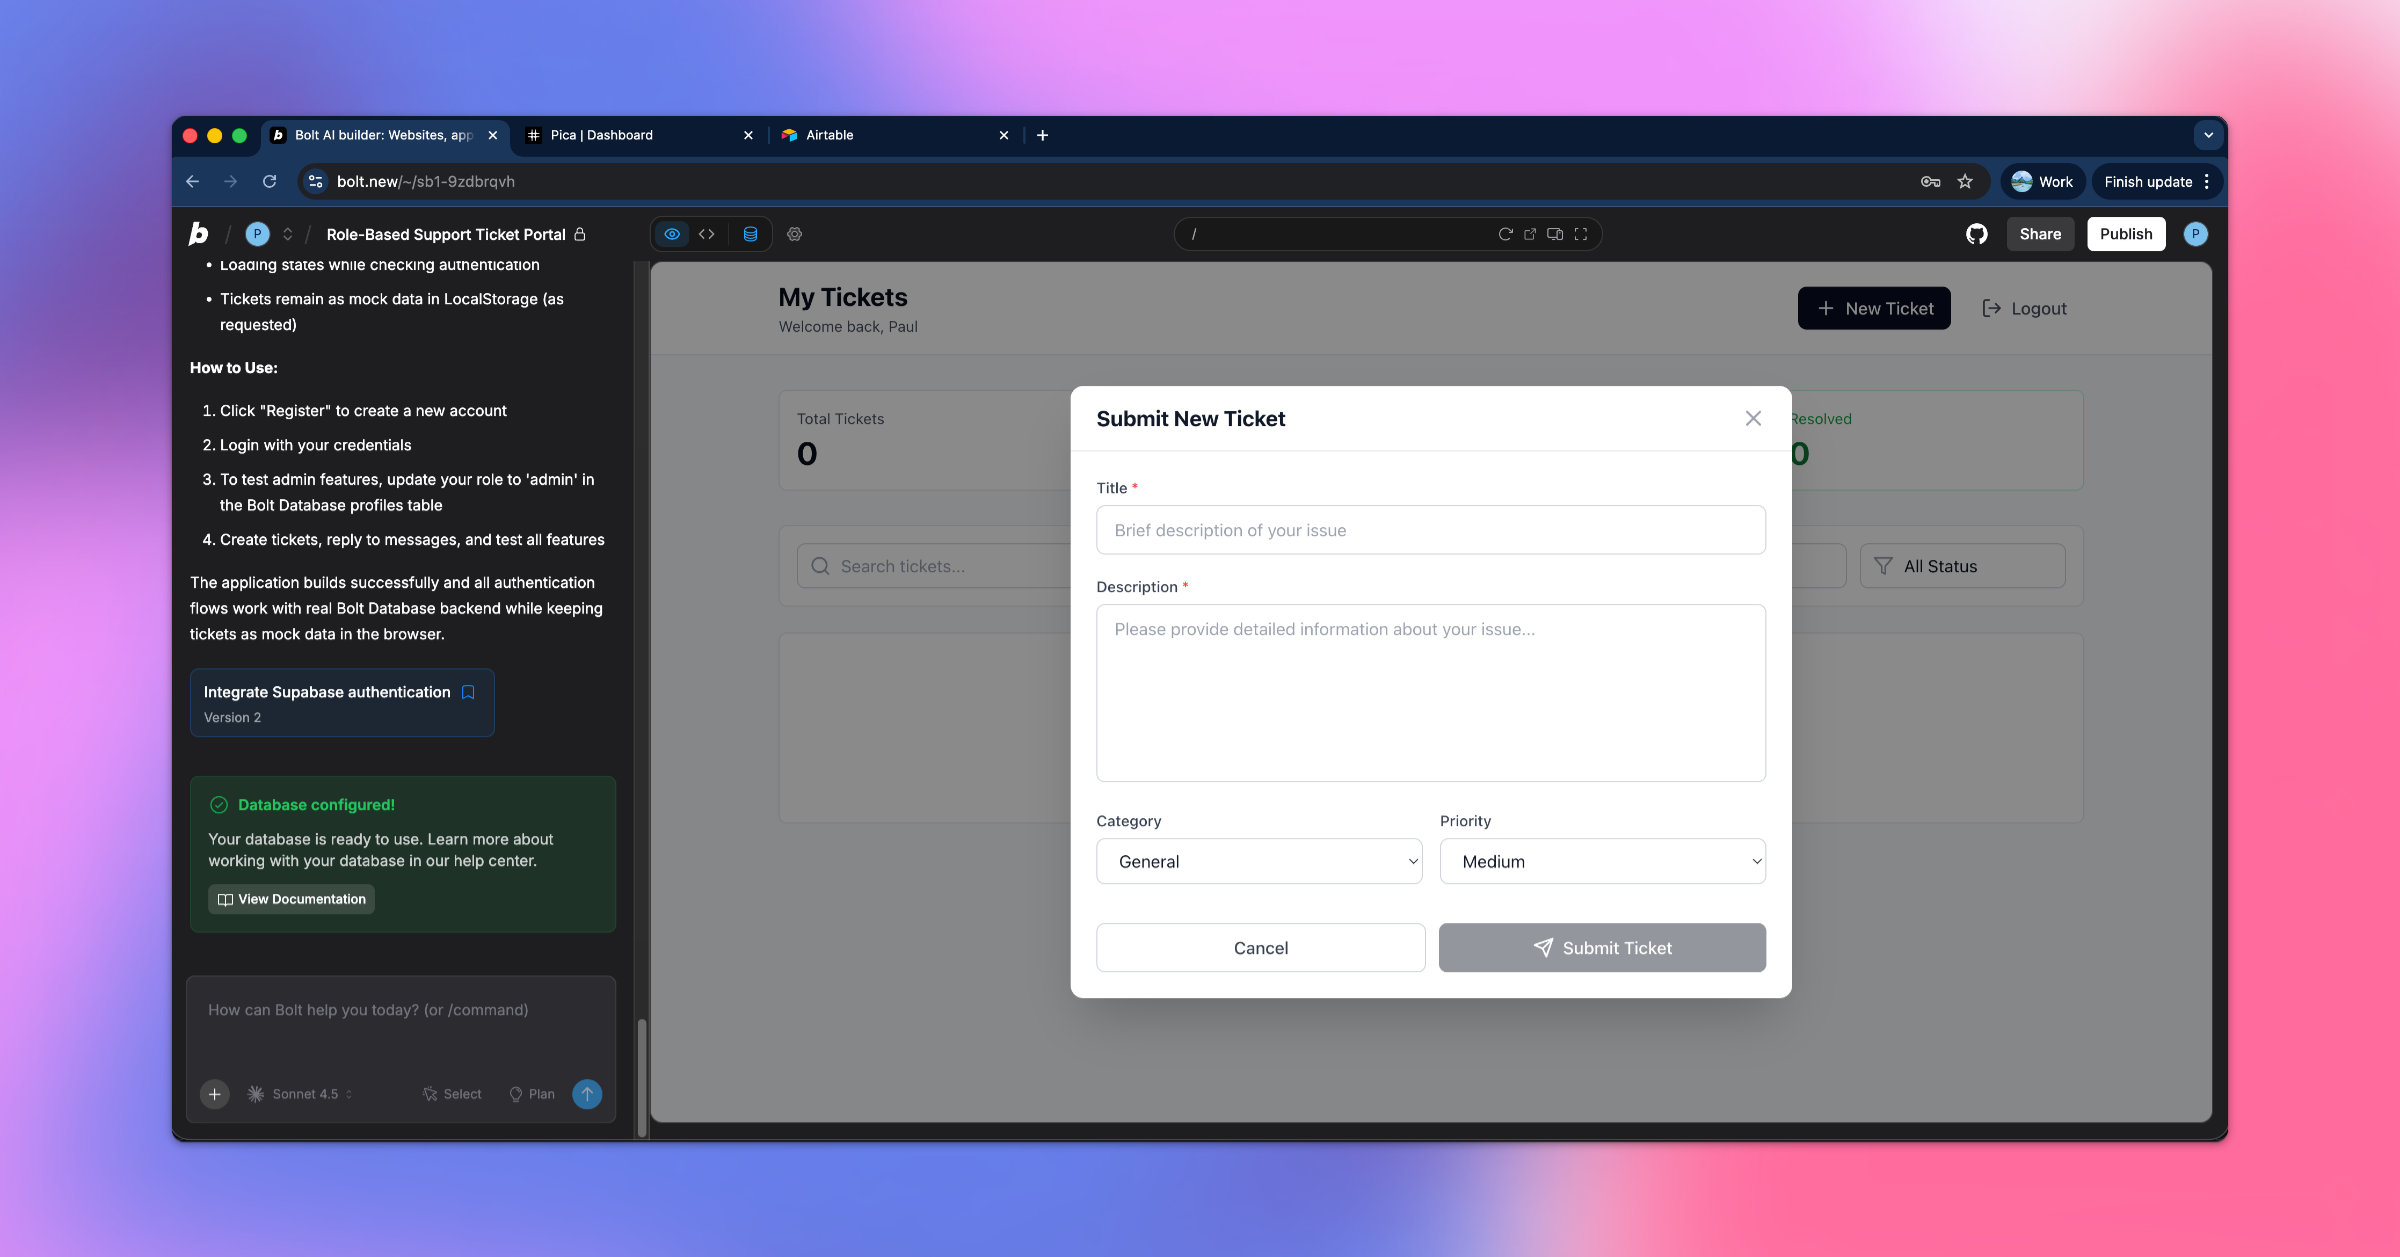
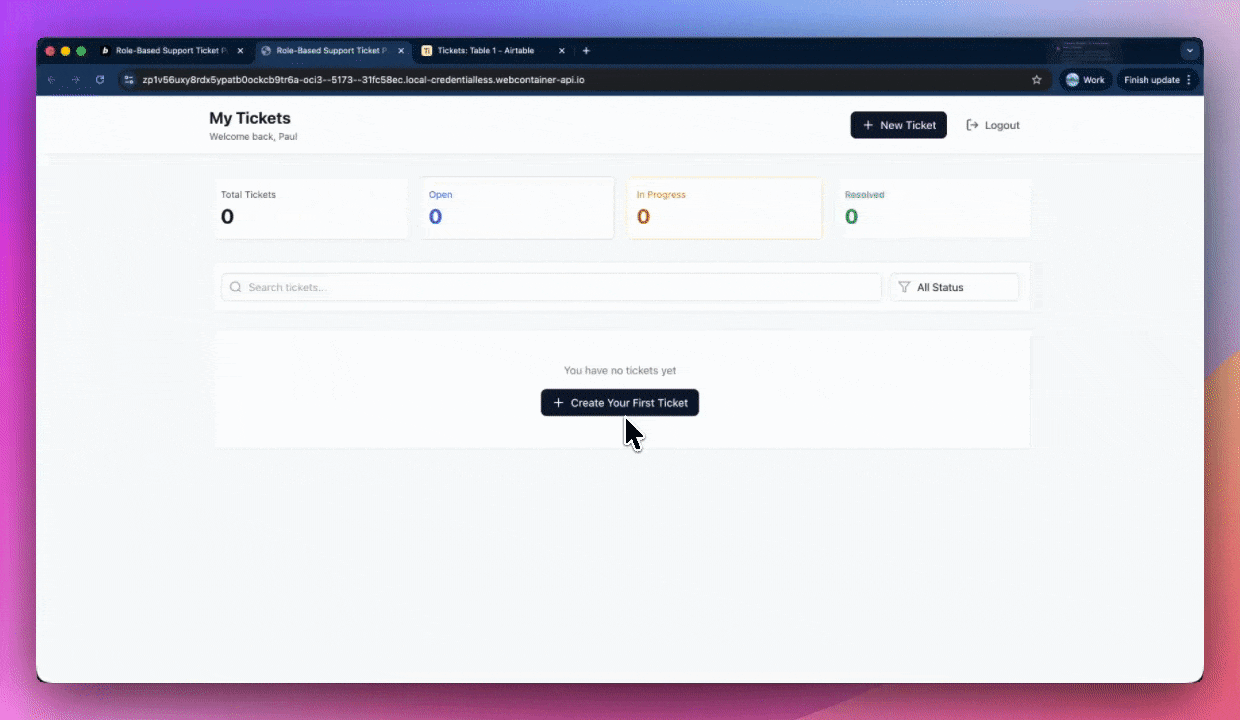
Step 1: Build the Support Ticket Portal UI
First, let's create the UI with authentication and role-based access using Bolt's authentication system.
Prompt Bolt:
"Build a support ticket portal UI with authentication. Support two roles: users and admins. Users can submit tickets, view their tickets and statuses, and read/respond to message threads. Admins can view all tickets, reply, and update ticket statuses. Implement real auth logic using Bolt authentication and UI only. Do not persist ticket or message data yet (use mock data)."
Click "Enhance Prompt" & Submit
Bolt will enhance your prompt and generate a beautiful, responsive support portal!
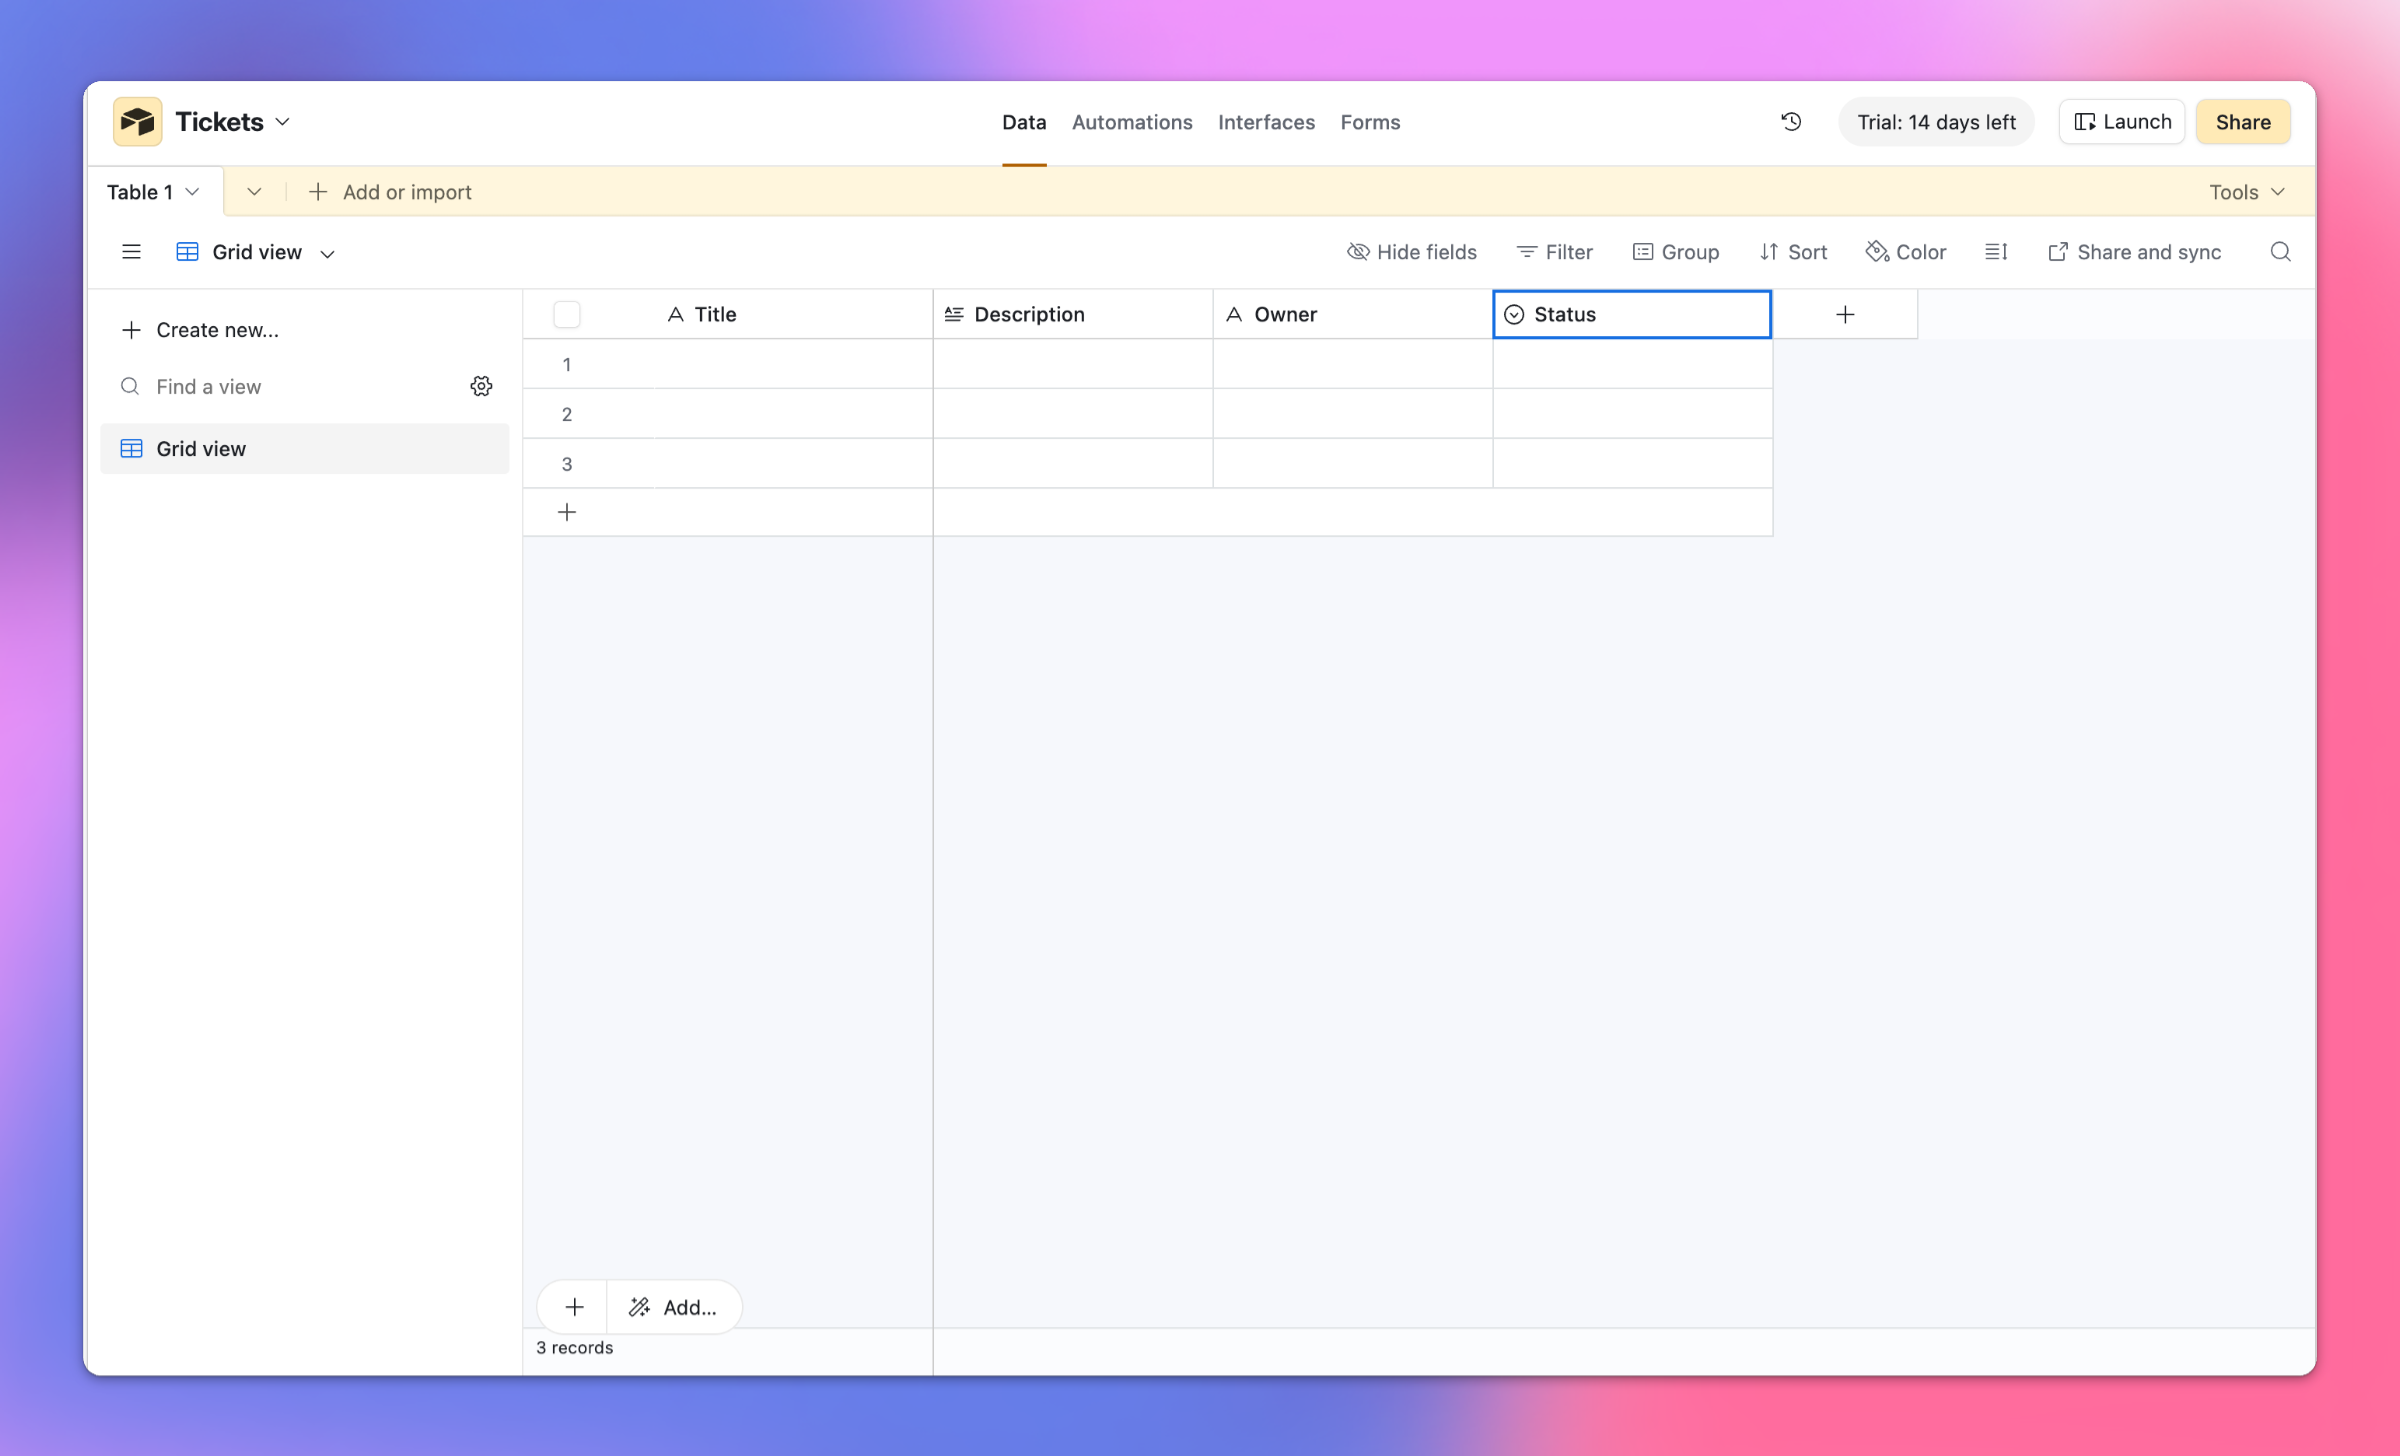
Step 2: Setup Airtable Base
Now let's create your Airtable database to store ticket data.
Creating Your Airtable Base:
- Go to Airtable and create a new base
- Name it: Tickets
- Create a table with these fields:
| Field Name | Field Type | Description |
|---|---|---|
| Id | Single line text | Unique ticket identifier |
| Title | Single line text | Ticket title |
| Description | Long text | Detailed ticket description |
| Owner | Single line text | Email or ID of ticket creator |
| Status | Single select | Options: Open, In Progress, Resolved, Closed |
Step 3: Create an Airtable Connection in Pica
You need to connect your Airtable account to Pica so your portal can store and retrieve tickets.
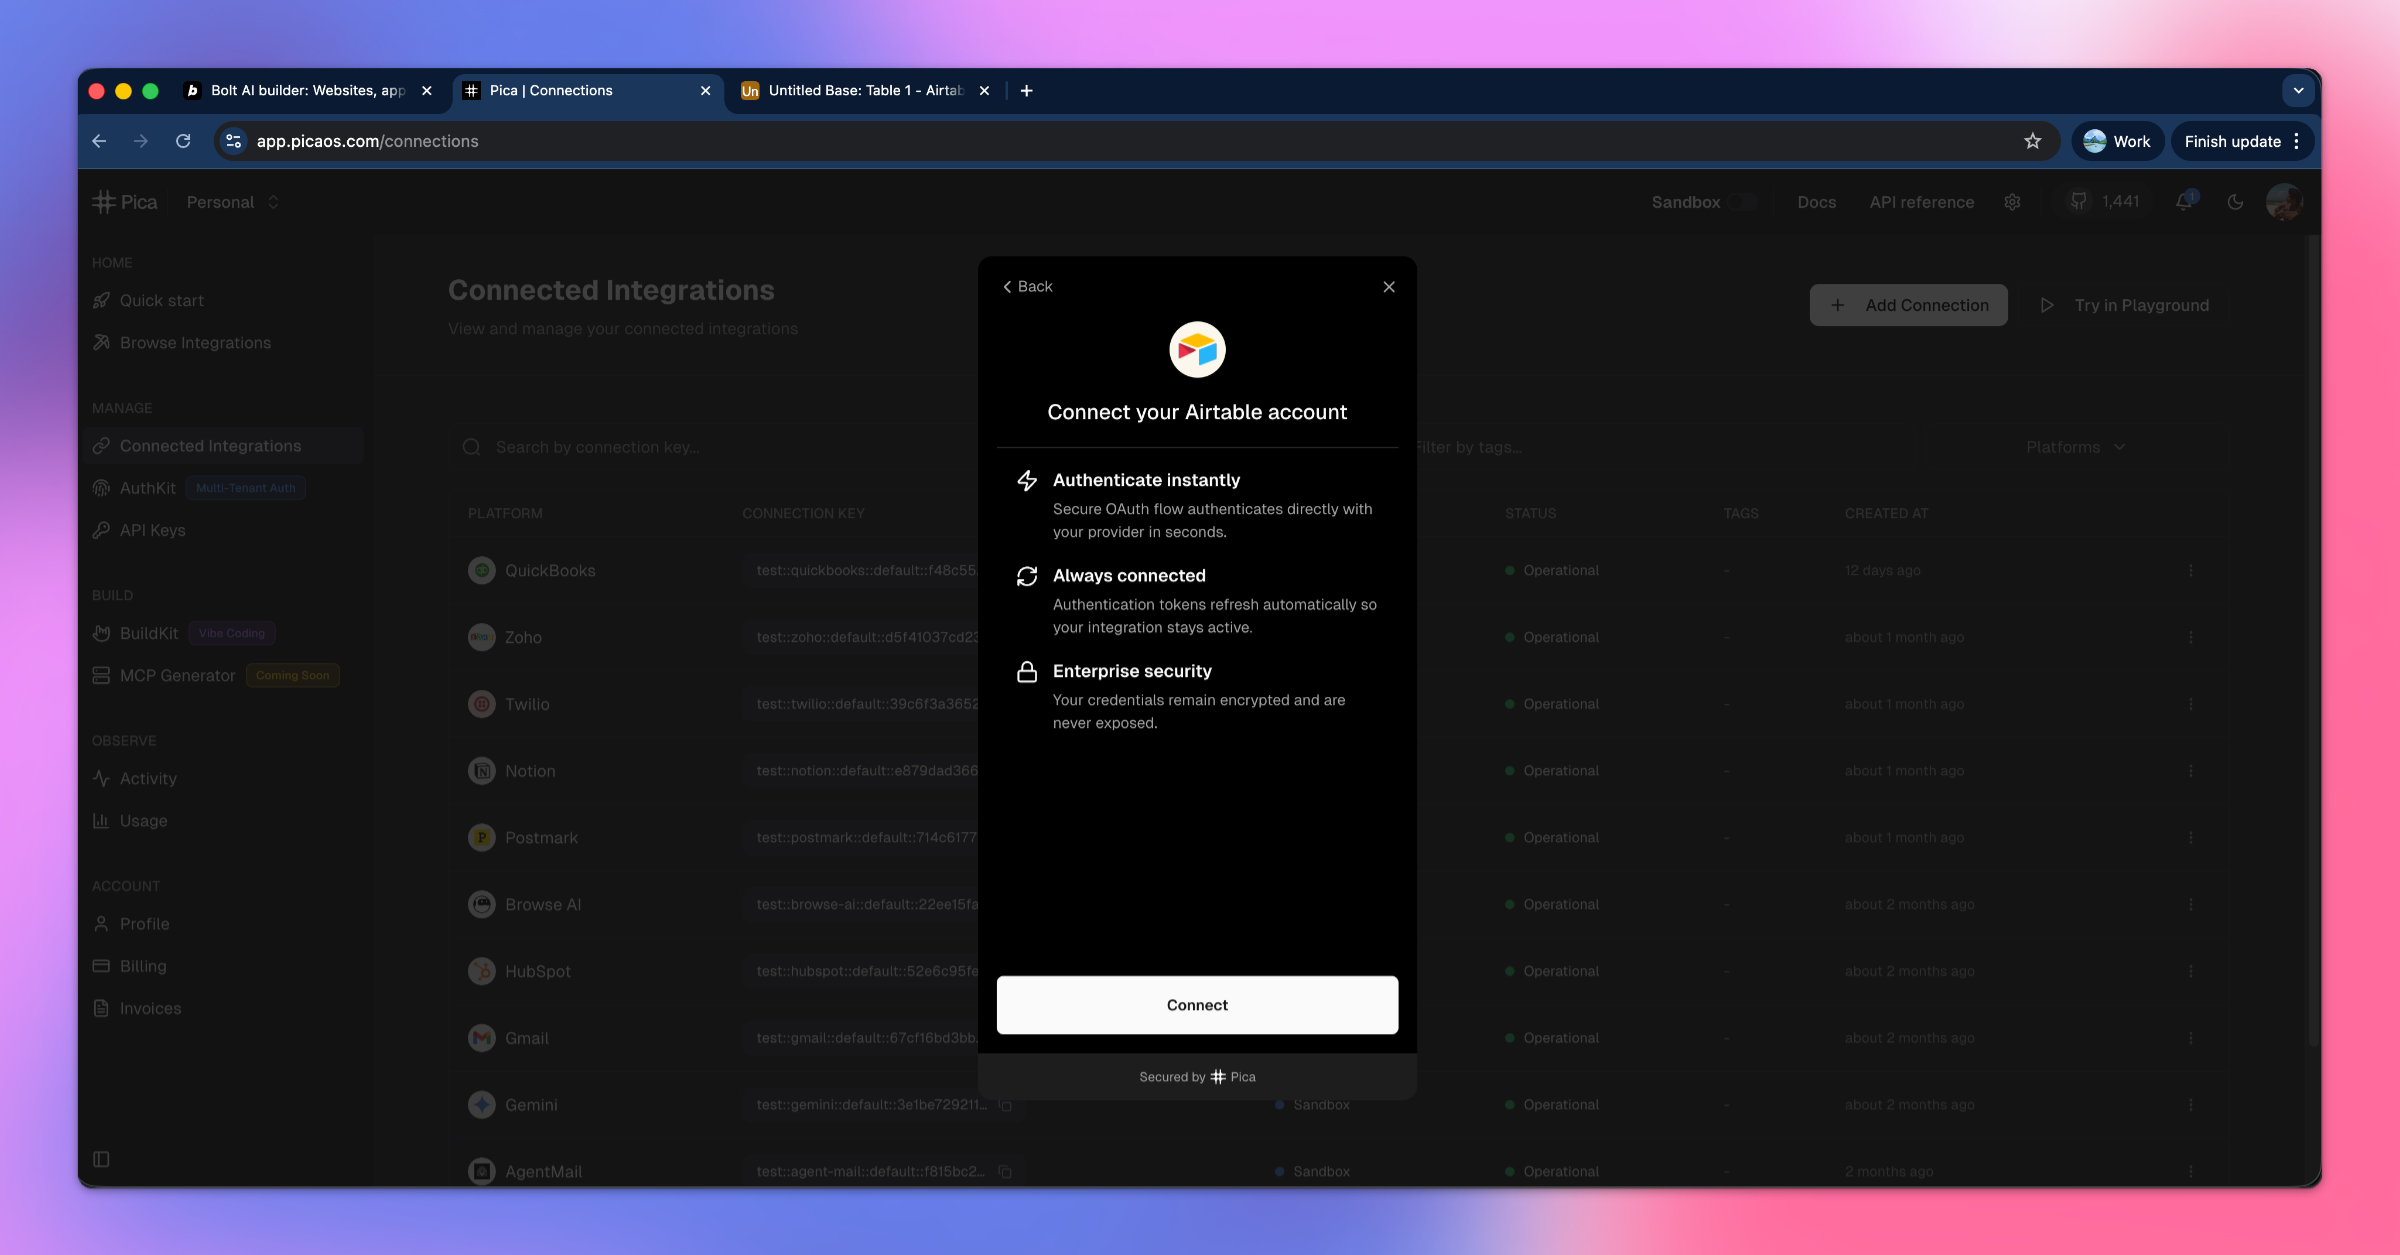
How to Connect Airtable:
- Go to the Pica dashboard at: app.picaos.com/connections
- Click on
+ Add Connection - Select
Airtablefrom the list of integrations - Authenticate with your Airtable account
- Grant access to your bases when prompted
- Save your connection key - you'll need this later!
Step 4: Get Your Airtable Base and Table IDs
To connect your portal to Airtable, you'll need to grab your base ID and table ID.
How to Find Your Base ID:
From the Airtable URL:
https://airtable.com/appWbKT2HgWOt2cb9/tbl9GTOQjoCPDmYYo/viwGLLazcLw4XSmYj?blocks=hide
- Base ID:
appWbKT2HgWOt2cb9(starts withapp) - Table ID:
tbl9GTOQjoCPDmYYo(starts withtbl)
Keep these IDs handy - you'll need them in the next step!
Step 5: Generate Your Code with BuildKit
Now we'll use Pica BuildKit to generate the perfect prompt for managing tickets in Airtable.
Using BuildKit:
- Go to the BuildKit page at: app.picaos.com/buildkit
- Type: "Create records, list records and get schema in an airtable base."
- BuildKit will generate an optimized prompt for you
Or copy the prompt here:
🚀 Next step: Copy the prompt above and paste it into Bolt.new to create your backend logic!
What BuildKit Does:
BuildKit automatically generates a prompt that includes:
- ✅ Proper API authentication setup
- ✅ Create ticket functionality with all fields
- ✅ List tickets with filtering options
- ✅ Get base schema for dynamic field mapping
- ✅ Error handling best practices
- ✅ Environment variable configuration
- ✅ Integration with your Pica Airtable connection
Step 6: Add Your Secrets to Bolt
Once Bolt generates your application, you'll need to add your API keys as environment variables.
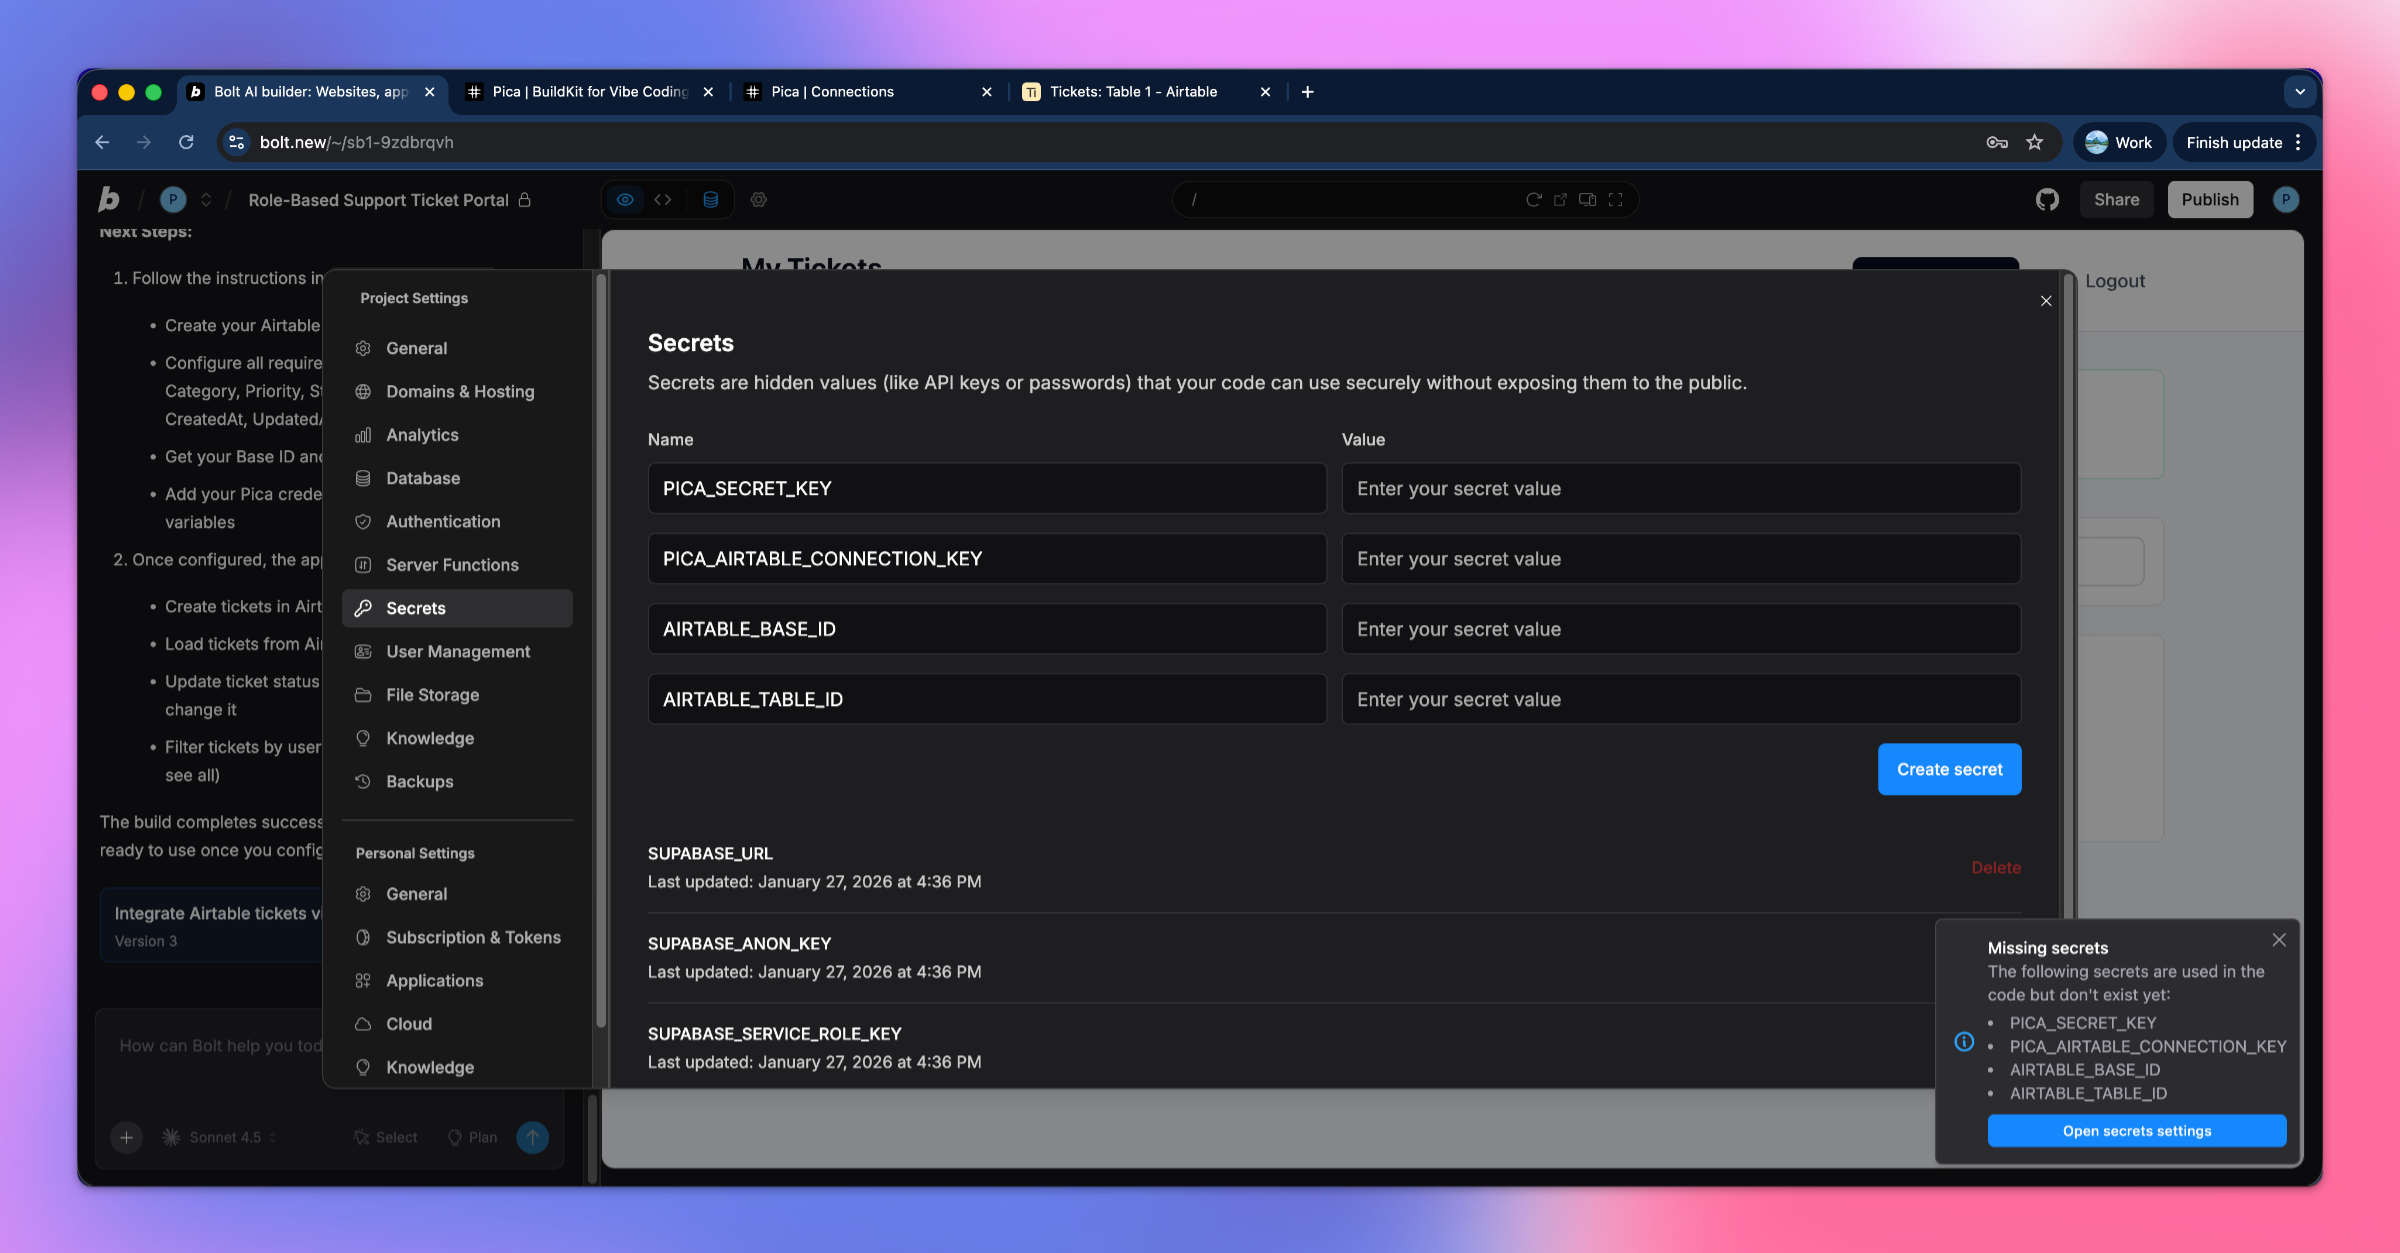
Required Environment Variables:
1. PICA_SECRET_KEY
- Get it from: app.picaos.com/settings/api-keys
- This authenticates your application with Pica
2. PICA_AIRTABLE_CONNECTION_KEY
- Get it from: app.picaos.com/connections
- This is the connection key you saved in Step 3
3. AIRTABLE_BASE_ID
- The base ID from Step 4 (e.g.,
appWbKT2HgWOt2cb9)
4. AIRTABLE_TABLE_ID
- The table ID from Step 4 (e.g.,
tbl9GTOQjoCPDmYYo)
How to Add Secrets in Bolt:
- Click on the Settings icon in Bolt
- Navigate to Secrets
- Add all four keys with their respective values
- Save and restart your application
Now your support ticket portal is connected to Airtable and will persist all ticket data! 🎉
Step 7: Try It in Action!
Test your support ticket portal by creating tickets and managing them with different roles.
Testing as a User:
- Log in as a regular user
- Create a new support ticket with a title and description
- View your submitted tickets
- Add messages to ticket threads
- Watch status updates from admins
Testing as an Admin:
- Log in as an admin
- View all tickets from all users
- Reply to ticket messages
- Update ticket statuses (Open → In Progress → Resolved → Closed)
- See changes reflected in real-time in Airtable
Troubleshooting
Tickets not saving to Airtable?
- Check your environment variables - Make sure all four keys are set correctly in your Bolt secret settings
- Verify your Airtable connection - Go to app.picaos.com/connections and ensure it's active
- Check base permissions - Make sure your Airtable connection has write access to your base
- Verify base and table IDs - Ensure you're using the correct IDs from your Airtable URL
- Check field names - Field names are case-sensitive (e.g., "Title", "Status")
- Check Pica logs - View execution logs in your Pica dashboard
Authentication not working?
- Check Bolt auth setup - Ensure authentication is properly configured in your Bolt project
- Verify role assignments - Make sure users are assigned the correct roles (user vs admin)
- Check protected routes - Ensure role-based access control is implemented correctly
Tickets not filtering by user?
Make sure you're filtering tickets by the Owner field to show only tickets belonging to the logged-in user. Admins should see all tickets without filters.
Conclusion
Congratulations! 🎉 You've just built a production-ready support ticket portal in minutes. Users can now submit and track their support requests, while your admin team can efficiently manage and resolve tickets—all powered by Airtable!
What you've accomplished:
- ✅ Full authentication with role-based access
- ✅ Ticket creation and management
- ✅ Message threading for conversations
- ✅ Admin controls for status updates
- ✅ Persistent storage with Airtable
- ✅ Production-ready error handling
Ready to add more integrations? Explore other Bolt use cases to supercharge your application with Pica.
Get Help
Questions or need support?
- 📅 Schedule a call with our team
- 📚 Check out the Pica documentation
- 🎥 Watch our video tutorials
Happy building! 🚀